
|
Imagine, you have made a bag in tapestry crochet and you are thinking of making a strap with card (or tablet) weaving. But you have some doubt.
* You might not like it * It is only for one bag * You don't have much budget |
|
| You don't have to buy anything - or not much - if you are a handy person who always keeps stuff-wich-could-come-in-handy. The most important is a piece of shelf so you can create your own Low Budget Loom. |
||
| Get some sturdy carton for the cards. On the Internet you can also find examples of making them from playing cards. | 
|

|
|
*Cut square cards.
*Make holes in the angles. Be sure to align them as neat as possible. *Cut the corners to avoid yarn getting stuck when you turn the cards. *If you want to follow a pattern like the "Ramshoorn" (Dutch text) you can put some colored paper on the cards (top and bottom). *For the weft make a cut on all four angles, wrap around the yarn a few times, then fix it in an angle-cut. When your card slips out of your hand it will stop to unroll on a fixed point. |
||

|
For the basic of the loom take a shelf of about 50/60 cm. Fix another piece of wood on the back. A flat shelf doesn't work well since the cards are difficult to turn and tend to fall.
Be sure to fix the back piece tight enough. There is a lot of tension on the yarn when you turn the cards. The little white triangle on the picture is normally used to strenghten a rickety cupboard. | |
| When your strap grows use a round piece of wood or cut some pieces of cane. | ||

|
If you use cane, cut it close to the connection points. Shed or file the pieces, be careful not to hurt yourself! You can use screws, brackets or nails to fasten your work. Just watch the images and your collection of 'stuff' to get some ideas. | |


|
When I start a strap I attach a piece of wood with some hooks on the frontside of my loom. For the next part to weave I change it for a piece of cane (see pictures). Use supplies like a kitchen s-hook and rubber band to attach yarn to your loom. | |
|
To keep the tension on your strap you can attach two pieces of cane with a rubberband somewhere on the backside of your shelf/loom. | ||

| On the backside you can also use a s-hook and rubberband(s). Other usefull items could be paper clippers or clothespins.
|

|
|
More usefull stuff: *Tape to make sure your strap stays about the same width. *A wide pin to secure your cards. You can also put a crochet hook through the holes and secure it with a rubber band. *A smooth piece of wood to tighten the wefth. I use a bamboo crochet hook. |

| |

|
Left: an extensive version of the Low Budget Loom Right: And when you finished your strap... Pull the yarn in small bundels through some of the stitches of you bag. Regroup them and braid the yarn. |

|
donderdag 11 oktober 2018
Low Budget Loom for Card Weaving
vrijdag 21 september 2018
Card weaving
Short time before the summer I accidently discoverd card (or tablet) weaving. So I tried. Watched some videos. Read on websites. Tried some more. The biggest struggle was to warp the S & Z correctly. The second was turning the cards in two directions. Certainly with wool! So I choose to flip the cards and 'translated' diagrams with F&B directions to diagrams where you can easily see wich card you have to flip + the direction of the cards on every turn.
On my cards I taped a piece of red paper between A-B and green paper between D-C. The red and green lines in the diagrams show where you have to flip some of the cards (a little triangle).
For the warping I keep ABCD on the right side, no matter if it is S or Z. Instead of using these letters where to warp I use the position. It is marked in Dutch and means Up (B), Down (O), Front (V) and Back (A).
The loom has a whole bunch of nails so it is easy to put each group of 4 threads on their right place. After the warping it is just a matter of putting all the cards with ABCD to the right and 'voilà' it's done.
| Ram's horn The first diagram is shown on the picture with the felted cords. Second one is the original Ram's horn and a test diagram. The third one was my son's suggestion: "it looks like waves, if you use dark blue for the air and some stars in it...". In four of the dark blue cards is a white thread wich I flipt and turned unequally to create an irregular pattern of stars. |
||

| 
|  |
Flames This image can be found on the internet with the numbers of the cards you have to turn F & B. I translated it into a flip-diagram and to make it easier I warped some of the cards 'upside down'. So every two turns you have some red cards up - these are the ones to flip (except the edges). |
||

| 
| 
|
Cords |
||

|  | 
|
Cords on the left picture beneath this phrase are made of wool from an attick. There where a lot of weak spots so I threw them in the washing machine to get them more or less felted. And yes, it worked! 2d and 3d picture is a cord made of cotton to try out some of the diagrams. |
||

| 
| 
|
Diagrams |
||

| 
| 
|
Loom and warping On the third picture the cards are placed in S or Z position. Attached to knitting needles. It does work somewhat, but since the needles are not flexibel it was a bit difficult to pull the threads. Should try something more flexibel. |
||

| 
| 
|
zondag 27 mei 2018
Camboulan Crochet
 |
Named after the picknickplace where this originated. In a small village in 'Les Corbières'. So nothing to do with the castle (unless one is named after the other). After experimenting with 'weefhaken' I started to improvise. It was just the little crochet project to do without a lot of thinking while my dog was chasing fish.
Nommé d'après la place picknick d'un petit village dans des Corbières. Donc rien à voir avec le château (sauf si l'un est nommé après l'autre). Après avoir expérimenté avec 'weefhaken' j'ai commencé à improviser. C'était juste le petit projet de crochet à faire sans beaucoup de réflexion pendant que mon chien chassait les poissons. |
|
 |
||
| On my website you'll find
step by step pictures of the making of the square here on the right, wich I finally used to make a phone case. Under each image there is a link to a youtube video just to show the stitch. |
 |
Sur mon site web vous trouverez des photos pas à pas de la réalisation du carré ici à gauche, que j'ai finalement utilisé pour faire un cas de téléphone. Sous chaque image il y a un lien vers une vidéo youtube - juste pour montrer la façon de le crocher. |
 |
Link / Lien => Link direct to one of the youtube videos - Lien direct vers l'une des vidéos sur youtube. |
dinsdag 15 mei 2018
Poppy shawl

|
||

|
 |
 |
| It is May again. The poppies bloom. Time to crochet a Poppy shawl. A pattern that can be adjusted as desired. A large shawl or a simple version for over your shoulders. | ||
 |

|
 |
 |
 |
 |
| The pattern is from two years ago when I had sorted all my cotton leftovers on color and was thinking what to make with the large amount of red shades. Just a little scoop or two balls of the same color. The poppies bloomed and I noticed that they had different shades of red.
Trying out, taking out, starting over again and eventually the big shawl emerged. After I had put a picture of it in a facebook group, people asked me whether I wanted to share it. Since I had never transformed my own notes into a readable pattern (for others...) I asked a few people to join a chat-group for a try-it-out. Bit by bit, the file for the pattern of the poppieshawl was created. The pattern can be downloaded on Ravelry. And of course you can make it in other colors as well. Nederlandse blog | ||
woensdag 9 mei 2018
Filtarsia
 |
| Or; how to combine filet crochet and intarsia
Nederlandse versie |
| Both colors in filet crochet
Colors are mentioned as shown on the pictures | ||
| The basic
As usual with intarsia. Make a double crochet (in blue), but don't finish it completely. Leave the last two loops on your hook and finish the double crochet with the other color (here: yellow). |
||
 |
Right on top
Don't finish the last yellow dc. Pull the blue yarn - not to tight! - and finish the dc. Make a chainstitch (ch) UNDER the yarn (see a bit further for example). And then a blue dc in the last blue dc of the former row. |
|
 |
One square earlier
Finish the last blue dc with the yellow yarn (2). Don't pull it to tight! Make the ch UNDER the yarn (3). This way the yarn will be on top of the row you are making. Make the dc IN FRONT OF the yarn (4, 5). Then again a ch UNDER the yarn (6). When you make the dc on the last dc of the former row you can put the yarn on the left of the stitch to hide it even more (7). |
|
 |
One square further
Put the blue yarn above the dc of the last row so you can hide it as much as possible when making the yellow dc. Finish the yellow dc with the blue yarn. |
|
 |
Two (or more) squares earlier
Start with the last blue dc and finish it with the yellow yarn. Don't pull the yarn too tight! Make the chainstitches UNDER the yarn (2, 4) and the double crochets IN FRONT OF the yarn (3, 5). Picture 6 shows the back side ("Achterkant"). |
|
| Two (or more) squares later
Put the blue yarn on top of the last row. With every double crochet fix the blue yarn onto the stitches. When making the first blue double crochet don't pull the yarn too tight! |
||
 |
Alternate
In this case you can take the blue yarn and fix it onto the last row with the yellow dc. When you need to make a yellow one after this one, also take the yellow yarn. Otherwise you have to take another piece of yarn for every little stitch and work the ends in... |
|
| Combination of open and filled squares | ||
| Same as above. Finish the last dc with the second yarn. Make a chain stitch and continue with the dcs in the diagram. Finish the last one of these dc's with the first color. | ||
 |
||
| To make clear why you should make the chain stitches under the yarn and the dc in front of it, in the next series of pictures it is NOT done like that and you can see a longer piece of the light brown yarn (3). | ||
 |
||
 | ||
| If you have a filled part above a filet part put the filled-part-color (here light brown) on top of the last row. Fix the yarn with the dark brown dc's. | ||
| From an open to a closed part: make the first chain stitch UNDER the yarn. Then put the yarn on top of the last row and fix it with the dc's. Like with normal intarsia. | ||
 | ||
 |
 |
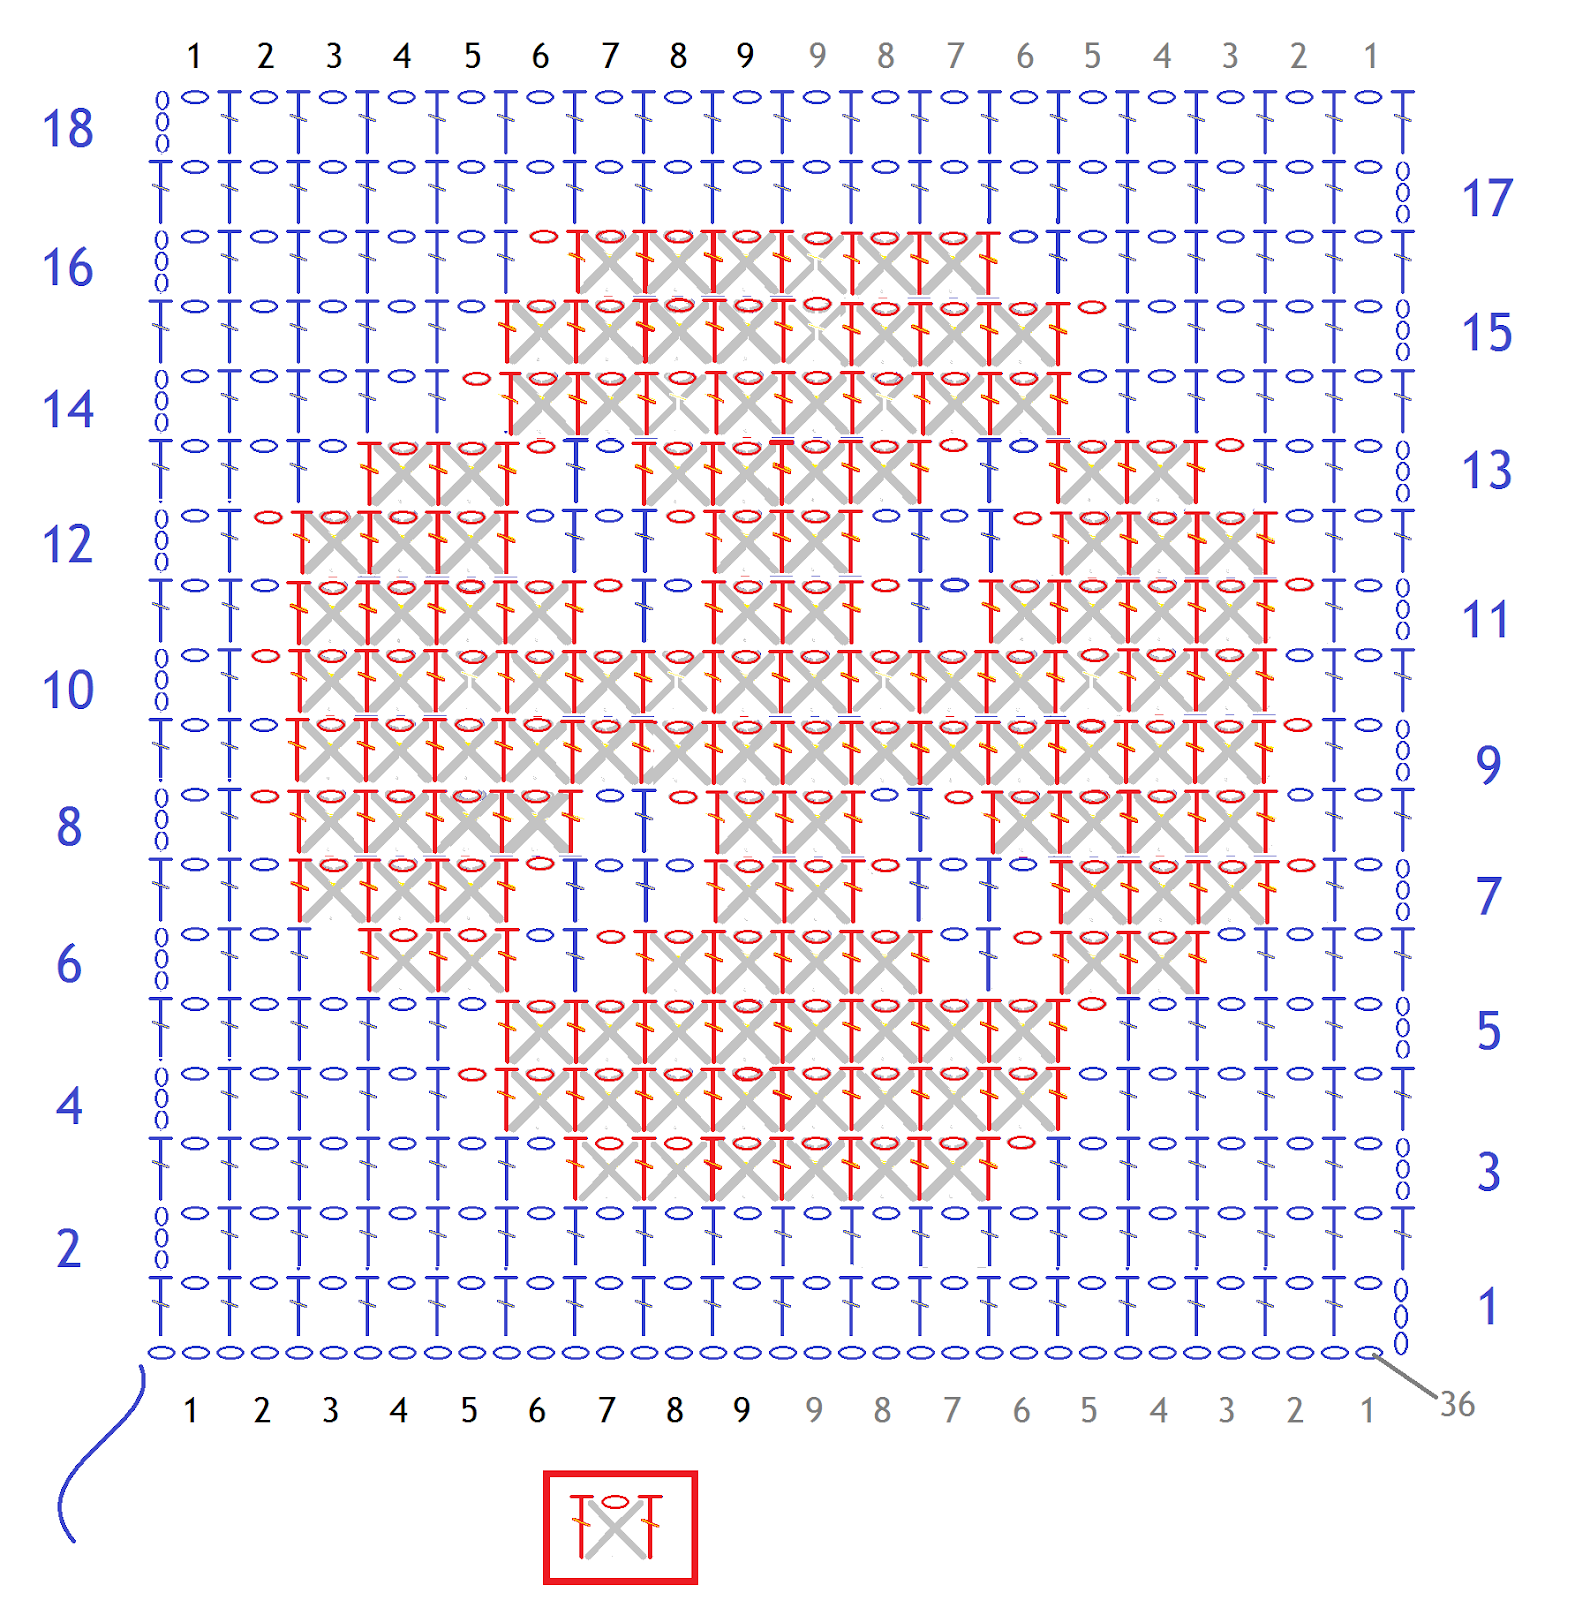
Four examples. 18 x 18 squares = 37 stitches and 18 rows. |
| Same basic pattern
One closed ... |
 |
 |
| ... the other open |  |
 |
 |
 |
|
 | The pdf of the galopping horse can be found on Ravelry. Written in Dutch but with a international chart for the horse. | |
 | Also on Ravelry, written in Dutch but with a chart for the image mare and foal. | |
Abonneren op:
Posts (Atom)