zondag 27 mei 2018

Camboulan Crochet

Named after the picknickplace where this originated. In a small village in 'Les Corbières'. So nothing to do with the castle (unless one is named after the other). After experimenting with 'weefhaken' I started to improvise. It was just the little crochet project to do without a lot of thinking while my dog was chasing fish.

Nommé d'après la place picknick d'un petit village dans des Corbières. Donc rien à voir avec le château (sauf si l'un est nommé après l'autre). Après avoir expérimenté avec 'weefhaken' j'ai commencé à improviser. C'était juste le petit projet de crochet à faire sans beaucoup de réflexion pendant que mon chien chassait les poissons.
Camboulan
On my website you'll find
step by step pictures of the
making of the square here
on the right, wich I finally
used to make a phone case.
Under each image there is
a link to a youtube video
just to show the stitch.
Sur mon site web vous trouverez des photos pas à pas de la réalisation du carré ici à gauche, que j'ai finalement utilisé pour faire un cas de téléphone. Sous chaque image il y a un lien vers une vidéo youtube - juste pour montrer la façon de le crocher.


Link / Lien => Link direct to one of the youtube videos - Lien direct vers l'une des vidéos sur youtube.

dinsdag 15 mei 2018

Poppy shawl

It is May again. The poppies bloom. Time to crochet a Poppy shawl. A pattern that can be adjusted as desired. A large shawl or a simple version for over your shoulders.
The pattern is from two years ago when I had sorted all my cotton leftovers on color and was thinking what to make with the large amount of red shades. Just a little scoop or two balls of the same color. The poppies bloomed and I noticed that they had different shades of red.

Trying out, taking out, starting over again and eventually the big shawl emerged. After I had put a picture of it in a facebook group, people asked me whether I wanted to share it. Since I had never transformed my own notes into a readable pattern (for others...) I asked a few people to join a chat-group for a try-it-out. Bit by bit, the file for the pattern of the poppieshawl was created.

The pattern can be downloaded on Ravelry.

And of course you can make it in other colors as well.

Nederlandse blog

woensdag 9 mei 2018

Filtarsia

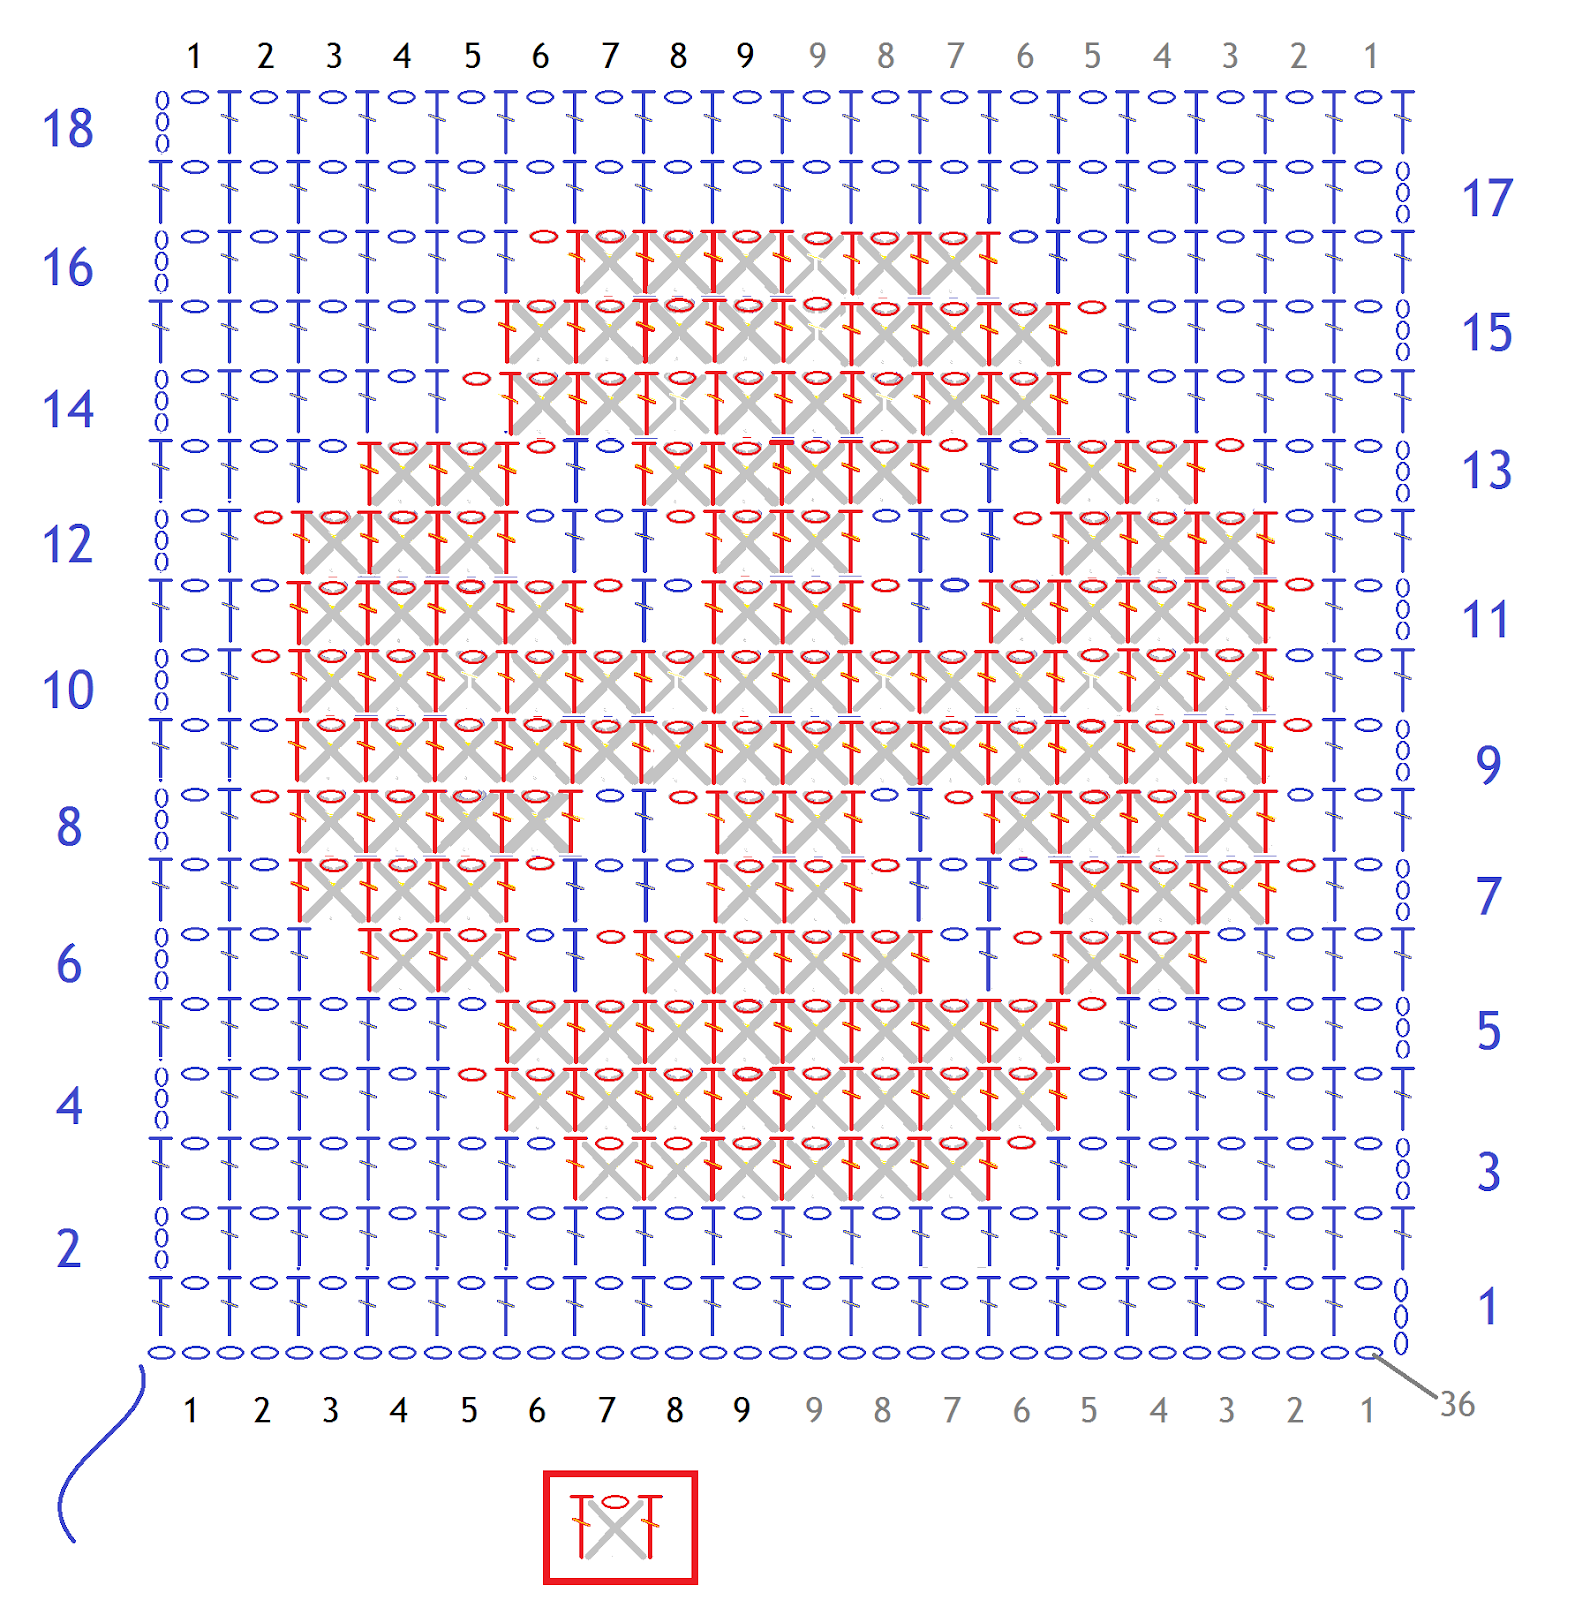
Or; how to combine filet crochet and intarsia

Nederlandse versie


Both colors in filet crochet
Colors are mentioned as shown on the pictures

The basic
As usual with intarsia. Make a double crochet (in blue), but don't finish it completely. Leave the last two loops on your hook and finish the double crochet with the other color (here: yellow).

Right on top
Don't finish the last yellow dc. Pull the blue yarn - not to tight! - and finish the dc. Make a chainstitch (ch) UNDER the yarn (see a bit further for example). And then a blue dc in the last blue dc of the former row.

One square earlier
Finish the last blue dc with the yellow yarn (2). Don't pull it to tight! Make the ch UNDER the yarn (3). This way the yarn will be on top of the row you are making. Make the dc IN FRONT OF the yarn (4, 5). Then again a ch UNDER the yarn (6). When you make the dc on the last dc of the former row you can put the yarn on the left of the stitch to hide it even more (7).

One square further
Put the blue yarn above the dc of the last row so you can hide it as much as possible when making the yellow dc. Finish the yellow dc with the blue yarn.

Two (or more) squares earlier
Start with the last blue dc and finish it with the yellow yarn. Don't pull the yarn too tight! Make the chainstitches UNDER the yarn (2, 4) and the double crochets IN FRONT OF the yarn (3, 5). Picture 6 shows the back side ("Achterkant").

Two (or more) squares later
Put the blue yarn on top of the last row. With every double crochet fix the blue yarn onto the stitches. When making the first blue double crochet don't pull the yarn too tight!

Alternate
In this case you can take the blue yarn and fix it onto the last row with the yellow dc. When you need to make a yellow one after this one, also take the yellow yarn. Otherwise you have to take another piece of yarn for every little stitch and work the ends in...

Combination of open and filled squares
Same as above. Finish the last dc with the second yarn. Make a chain stitch and continue with the dcs in the diagram. Finish the last one of these dc's with the first color.
To make clear why you should make the chain stitches under the yarn and the dc in front of it, in the next series of pictures it is NOT done like that and you can see a longer piece of the light brown yarn (3).

If you have a filled part above a filet part put the filled-part-color (here light brown) on top of the last row. Fix the yarn with the dark brown dc's.

From an open to a closed part: make the first chain stitch UNDER the yarn. Then put the yarn on top of the last row and fix it with the dc's. Like with normal intarsia.

Four examples. 18 x 18 squares = 37 stitches and 18 rows.
Same basic pattern
One closed ...
... the other open


The pdf of the galopping horse can be found on Ravelry. Written in Dutch but with a international chart for the horse.
Also on Ravelry, written in Dutch but with a chart for the image mare and foal.

maandag 23 april 2018

Maraya's Shawl (US terms / Français)

This shawl is made of borders with front post double crochet (fpdc) and filet crochet with half double crochet (hdc) in the inside. You can adjust the size of the shawl as well as the sizes of the borders.

Ce châle est composé de bords de brides en relief avec un filet de mailles en l'air et de demi-brides. La taille du châle, l' hauteur/épaisseur des bords, l'intérieur; Tout est ajustable.

In my blog you'll find the charts to make it or you can download an extended version for free on Ravelry.

Dans mon blog, vous trouverez les schémas pour le faire. Ou clicquez sur le lien ci-dessus, qui vous mène à une version étendue gratuite.


In the chart above there are 5 front post double crochets for the edges. You can customize it to the number you want.

Start with a chain of the wanted number of stitches

Row 1; 2 or 3 ch (= first dc), dc on each ch
Row 2; 2 ch, fpdc on each dc of the first row, 2 dc*

* Each row is increased with two stitches. In the odd rows at the beginning, in the even rows at the end. You start the even rows at the top of the shawl.

Le schéma ci-dessus contient 5 brides en relief. Cela peut être personnalisé!

Commence avec une chaînette.

Rang 1; 3 m. air (= 1er bride) puis une bride dans chaque maille de chaînette.
Rang 2; 3 m. air, brR (bride en relief - toujours avant pour cette châle!) sur chaque bride du 1er rang. 3 brides*

* Pas littéralement 3 brides, voir méthode 1 ou 2

A chaque rang augmente avec deux points. Les rangs impair au début, les rangs pairs à la fin.


When the borders have the size you want start making the holes with a chain stitch. Increase wiht one hole every row. Thus: ch, hdc, ch, (hdc, ch, hdc, ch, etc.). Mark the first and last hole with colored yarn. They are a bit smaller and are easily lost.

Quand les bords ont la largeur désirée commencez à faire le premier résille vide. Il est conseiller de mettre des fils en couleur dans les résilles vides le plus haut et le plus bas, car ils sont plus petit que les autres.

(x aantal bollen of gewicht = x number of balls or weight)

"x aantal bollen of gewicht" = x nombre de pelotes ou poids

When you have reached the desired height you start with the middle part wich is also straightforward on the bottom.

If you use gradient yarn or you have a limited amount of yarn: weigh the first point and start decreasing when you have the same amout left over.

Or put the same number of balls aside that you have used for the first point.

Quand vous arrivez à la hauteur désirée, commencez la pièce de milieu qui est tout droit en-dessous.

Si vous crochetez avec un fil dégradé (unikat) pesez le point avant de commencer le parti droit au milieu. Commence le deuxième point quand il vous reste le même poids.

Si vous faites ce châle avec un nombre limité des pelotes, gardez le même nombre pour le deuxième point que vous avez utilisez pour le premier.


The butterfly can be put on any place and you can make as much as you wish. See shawsl above for examples.

Mettez autant de papillons que vous voulez. Voir les deux châles en haut de ce blog en exemple.

For the second point you have to decrease two stitches every row - see charts below.

Pour le deuxième point diminuez deux maille à chaque tour - voir les schémas en-dessous.

And of course you can make other motifs if you like. See some of my other shawls for ideas.

Et bien sûr, vous pouvez faire d'autres motifs si vous le souhaitez. Voir quelques-uns de mes autres châles pour vous donner des idées.